

I made a few current measurements. 3 LED (minimum strip size) consumes 24 mA. 300 LED (entire 16.4' roll) consumes 1.737 Amps. Each 3 LED section has a 150 Ohm resistor to limit current. A small SLA 12V battery will run a small strip for days/weeks.
Great product, very impressed.
Click Here For Most Helpful Customer Reviews >>
I wanted to buy some of these "light ropes" to put under my kitchen cabinets. Being the electrical engineer that I am, mostly power supplies, I found that there was a dearth of information about the things. I decided that I would take some data and take a few pictures to make it easier for people to understand more about them. I have submitted six pictures which you can find labeled "Fig. X", where X is 1-6. You can refer to them to help you understand my written description. I'm a big believer in a picture conveying information far better than any combination of words.How does it work? If you look at Fig. 1, you can see a simple schematic of it. There are 3 white LEDs in series with a 150 ohm current-limiting resistor. I call this series combination a "triad" (triad means "3"). When you apply a voltage, it is sufficient to light all 3 LEDs from the single power supply rail, which is recommended to be 12 volts. The rope then repeats this triad configuration every 1.95", which is approximated as 2" although that additional 0.05" is a 4% error and can amount to a large round-off error on a rope length of 5 meters (=16 feet).
In Fig. 3 you can see how the triad is arranged on the rope. At each 1.95" juncture, you can cut the rope if you need to. I show this "cut point" in Fig. 4. Note that when you do, you end up with little exposed copper solder "pads" at each end of the cut which allows you to solder small wires to these two ends. Fig. 5 shows you one of those ends where I soldered two small wires to the pads. You must be careful when you make such connections as the copper that you are soldering to is easily pulled up off of its "substrate," especially if you apply a lot of heat to these pads. The pads are quite small, perhaps 0.075", which for the layman is not an easy operation. I have a fancy "lab microscope" and a tiny, expensive soldering iron that I used to make the solder connections you see in Fig. 5, as well as allowing me to take the pictures you see in Fig. 4-6. I read where someone said you have to scrape off the insulation on these pads before you solder to them. Not true. You simply apply the iron tip to the pad, along with a small ball of solder, and it will quickly burn off this insulation (it's almost like wax) after which the solder instantly grabs the copper below.
Just because the rope is 16' long does not mean that it was manufactured as one long strip. It is not. Instead it is manufactured in 10 triad lengths, or about 19.5". The manufacturer then overlaps the end of one "mini-rope" to the start of another mini-rope, and solders one on top of the other. You can see this lapping operation in Fig. 6. There are 10 such "mini-ropes" spliced together, resulting in a total rope length of 19.5" x 10 = 195", or 16'-3", which is very close to 5 meters.
If you are good with a soldering iron, you can break this splice by applying the iron to both of these small balls and the lapped joint will separate cleanly. You're then left with two pieces whose ends look very much like you see in Fig. 5. Should you want to cut the rope at this lap joint, you cannot do it. You must either unsolder it, as I did twice, or move the entire cut points (at both ends of your cut rope) one triad over, which might result in your having to throw away one triad length of the rope.
Now we get into the electrical part of the discussion, namely "how much current does it draw?" I got out my lab power supply and applied it to the supplied wire ends (red = + and black = ) and slowly ramped up the voltage while the rope was still wrapped up in the reel that it comes in. Nothing happens until the voltage hits about 7.5 volts, at which you start drawing current. Current drain, as in amperes or milliamperes (mA), roughly speaking equates to light output. A very low current drain means that there is very little light. Lots of current drain means you have lots of light output, relatively speaking.
I moved up the voltage in 0.5V increments, and recorded the current, then plotted it out in the graph, Fig. 2. On the horizontal axis you see the voltage applied to the rope, labelled "Vrope." On the vertical axis is the current that the rope will suck up, in milliamps (mA). If you apply the recommended 12.0 volts at one end of the rope, this particular rope will draw about 1275 mA (= 1.275 A). Wattage equals voltage times current, so the total power drain of the rope with 12V applied is 12*1.275 = 15.3 watts. You can play with the math all you want: since there are 100 triads, then each triad must draw an average of 15.3 watts/100 = 0.153 watts = 153 mW. That means that each triad current = 153mW/12V = 12.75 mA, which is pretty darned small (for an LED).
Notice that in Fig 2 that you CAN power the rope with a smaller or larger voltage than 12.0V. You will get slightly less or more light, respectively. One word of caution, though: if you run more than 12.0V, you run the risk of burning out the little current-limiting resistors in the triad. They cannot take a lot of wattage without literally frying. I suspect that each of the LEDs can take considerably more power than these ropes draw at 12V. The weak link is the tiny resistor in each triad. I would suggest you keep the power supply voltage under 13.0 volts to prevent such burnouts.
If you placed your hand on a 15W lightbulb (like these ropes are drawing) you might get a nasty burn. Does that happen here? No. Why not? Because the power is spaced out over a 16' distance. On average, we're burning about 15.3 watts / 16' or about one watt per foot of rope. When you put your hand over these little LEDs, you only feel a small fraction of the total wattage, so it feels relatively cool. They in fact are barely warm to the touch when running.
One of the facts of life is that everything has resistance. Just because you apply 12.0V at one end of the rope does not mean that you will get 12.0 volts at the end of the rope. The LED triads are drawing current (1.275 amps), which means the two power tracks on the rope will drop a voltage. With 12.0V applied to the rope, I measure 11.1 volt at the end of it. If you string another light rope to the end of the first one, that 11.1V will sag even more because of the additional current drain of the second rope. Under such conditions (2 ropes in series) you will notice that the triads at the end of the second rope are noticeably dimmer than the triads near the power supply end. My recommendation is that if you want to power a second string that you NOT connect to the end of the first one. Instead you should connect the second rope's power lead directly to the power supply. if possible. This is called a "parallel" connection, where both ropes are connected to the power supply instead of being strung end-to-end, like Christmas tree lights. Also, remember that just because you use a wire between the power supply and the rope does NOT mean that this wire is perfect, that it will not drop a voltage. It always will because it always has resistance. You want to use as heavy a gauge of wire as possible to minimize this total voltage drop.
Okay, so how do you power these ropes? What are the requirements of the power supply you need for it? You know how much wattage this 16' string draws (15.3 watts), so you need to find a power supply that can supply that power. Practically, just because my one rope draws 15.3 watts does not mean yours will draw exactly that, too. There ARE slight differences in all of them, so you should usually guardband this by a small percentage, maybe 5%. Thus, a safe figure to use is 16W. If you want to use two ropes, you need a supply that can deliver twice this power, or about 32 watts. There is a small, skinny power supply that pops up here on Amazon that specifies 12V @ 2.5A = 30 watts. You will be on the cusp of brown out if you try to power a two-rope light system with it. Bear in mind that if you cut off a portion of a rope it's wattage drain will decrease. Therefore, if you are going to trim each rope to a smaller length, your wattage will decrease, letting you use this supply for two (shortened) ropes. But for two full lengths? You'll be pushing the limits. You should bump up to a larger supply, > 32W, to assure reliable operation.
It is a complex math problem, but you cannot assume that just because you cut one of these ropes in half that the wattage drain will decrease by half. It will not. I didn't bother trying to do the math, but cutting the rope in half will probably only result in only a 25-35% wattage decrease. This is NOT a linear system, which makes the math tough to do. I can't give you a simple formula for the wattage as a function of the rope length. The easiest way to measure it is to start with a full length rope, measure power, then cut off the end triad, measure. Repeat as you lop off one triad after another. You would then plot the wattage as a function of rope length. I guarantee you the resulting curve is NOT linear! And when you're done, you have chopped up your light rope into tiny, unusable pieces, so who wants to do that?
My resulting 2-row lighting system, with rope length for each row the equivalent of about 12', draws just under 1.9A, or about 23W. The two lengths are wired in parallel, not in series, as described above.
How does it all look when it's installed? Very nice! I first installed just one row of lighting at the back of the cabinet, but it casts harsh shadows on the backsplash area, AND the light output was just too dim. I then added a second row of lights at the front of the cabinet. This eliminated the shadowing problem and lit up the counter area very nicely. Because you have a lot of individual light sources, there is very little "shadowing" like you get with a point-source light. You get a decent amount of light, but I would hesitate to say it is sufficient to be "all the light you need to work on the counter." If that is your goal, I would recommend a third row of lights, down the middle of the cabinet. Once you do this, you probably have the equivalent of a set of 50W halogen downlights, but without all of that infernal heat! My primary desire was for visual effect, as in when the cooking is all done and everything washed and put away, then you flick on the lights and turn off most of the overhead lighting in the kitchen to add a little dramatic effect.
There is your lesson in electronics. Now for an observation about working with this rope. I managed to cut them up into smaller pieces under my cabinets and wire up the little ends one-to-another. (Let me tell you, it is difficult soldering upside down!) Because I'm an electrical engineer who has a lab microscope and a very expensive soldering iron with a very fine point, I managed to do it. Does the average Joe have this sort of equipment or ability? Regretfully, no. I knew what I was doing. I could solder tiny leads to tiny solder pads because I do that for a living. I doubt that you can. All of this leads me to conclude that while these light ropes are very cool -everyone who sees one all lit up immediately says "I want one!" -they are very difficult for the average person to connect.
Similarly, the connections at each end of the rope make absolutely no sense. One end has two long wires (red and black) that were very convenient for connecting to my lab power supply, but hugely useless for any other case. The other end has a very odd connector that leaves any person, including me, wondering "how the devil am I supposed to connect anything to THIS?" My solution was to cut through the globs of hot melt glue on each of these "connectors" and strip them completely off, leaving me with bare connections on each end such as you see in my Fig. 5. I do not believe that the average person can do what I did. I'm not trying brag.; I'm trying to warn you: the ropes are NOT easy to work with if you need to cut it up into pieces.
I needed to adapt the connector on the output of the power supply to connect it to the ropes, yet another mini-constructin project. I spliced in some connecting wires and put heat shrink tubing over the cut ends to seal them off. I found the power cord to be stupidly thick and unwieldly. I also cut off its end and replace it with an 18 gauge lamp cord w/plug. Some might argue that I have now created a safety hazard by cutting the safety ground lead off of the supply. However, a simple ohmic check shows that the safety ground appears to connect to nothing, certainly not the two output leads nor to the aluminum case, which has some sort of insulated anodized non-conductive coating. Once again, these changes are probably a tough thing for the average customer to do.
While these light ropes are delightfully small and provide very nice light output, they fail miserably because of the odd connectors on each end and the vendor's expectation that anyone can connect to the tiny solder points on the rope. I give the rope -ALL ropes -only 3 stars because of the unlikelihood that most people can chop them into smaller pieces and get them wired up. Someday, some enterprising company is going to solve this problem by offering a smart connection system to let you easily cut and connect these ropes into useful segments and get them wired up. Until then, three stars.
I hope that helps all of you. Good luck!
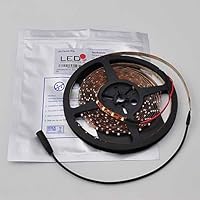
Best Deals for Flexible Light Strip 300 SMD White LED Ribbon 5 Meter or 16 Feet
I bought this along with the 30watt transformer 30 Watt LED Power Supply Driver Transformer 120 to 12 Volt DC Output, 3207 and then I cut the LED strip in 3foot strips and soldered the pieces together with 12v wire and mounted it the ceiling in a shed, about 8x10. I had enough to put under a couple shelves and I was quite surprised when I powered it on, it was very bright. The description doesnt say it comes with an adhesive backing, but it does. It may not be super sticky but works. I would recommend double-sided tape if you mount to the ceiling like I did. I cant wait to find another project to buy another strip.Honest reviews on Flexible Light Strip 300 SMD White LED Ribbon 5 Meter or 16 Feet
I purchased this item from LED Wholesalers with the PWM Dimming Control and 30watt Power Supply Transformer (120v to 12v) to see if this would work as a back-shelf light to brighten a very dark corner. I didn't know a lot about LED flex strips other than what I read online but thought it was a great idea so I took a chance and tried the 16 foot roll.Although a little bit expensive, I really love this product. It worked out perfectly after I also ordered the LED Strip light connector for each strip that I intended to cut from the 16 foot roll. The LED flex strips are easily cut to length and the connectors are very easy to connect to the ends of the strips. The only problem I encountered was one strip that I connected didn't light up but I just reversed ends and it worked fine (I think that the backing tape was covering the leads on the first try and switching the ends gave me a firm contact). The tape is easily marked where to cut and also labeled positive and negative so even non-electrically inclined people like me shouldn't have a problem.
The only improvement that I would suggest are longer leads on the connectors, but I bought some wire at my local radio shack and spliced in what I needed. I also had to jury-rig my shelf surface so that the tape would stick better (years of pledge and stuff on a very porous surface wouldn't let the tape adhere very well). Since the lights were to be put on the back side of the shelves against the wall I placed a strip of duct tape, stapled this on the shelf and the LED flex strips adhered just great. I saw a trac that works with the flex strips but since I wanted nearly zero clearance the trac wouldn't have worked in this case.
If anyone is thinking of buying this product and cutting to length I suggest ordering enough connectors for each end of lengths you cut if you are putting them in series (one continuous electrical circuit) or one connector for each length if running them non-continously (one left, one right, etc.) from the power source. If you are going to run one continous 16 foot strip (or more) both ends of the roll have leads already on them.
Find helpful customer reviews and review ratings for Flexible Light Strip 300 SMD White LED Ribbon 5 Meter or 16 Feet
For some reason this critical piece of information is nowhere to be found in the description of the product. But the package they arrived in clearly stated a 6k color temperature, this is key product information that should be in the product description.I have yet to do any thing but plug the spool in to confirm the color temp so for now it's 3 stars based on poor product information.
Update: Now that the listing includes the color temp and I have had a chance to install the lights and use them for a while this is now a 5 star product. I used these for bias lighting on an TV and they work great.

0 comments:
Post a Comment