
List Price: $46.04
Sale Price: $26.53
Today's Bonus: 42% Off

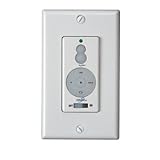
Exactly duplicates the wireless remote with no concern for batteries wearing out or lost remote and provides a convenient way to turn power off to the whole fan/light unit. Both this switch and the wireless remote still control the fan. Very easy to install. It took me longer to find the correct circuit breaker in to turn off then it did to install the fan control. All parts/supplies needed to install are included except optional electrical tape. Uses wire nuts are used to attach switch leads to house wires. Power switch glows green when on, so it is easy to tell that the master power is on. Comes with both white and ivory faceplate and switch cover. White is installed.
Click Here For Most Helpful Customer Reviews >>
Prior to purchasing, I read mixed reviews on this switch. Not sure what all the fuss was about. I think it is off the charts great. My house is older, and it was not wired for independent control of the ceiling fan (ie 3-wire so you can control the light and fan independently.) This ingenious switch solved the problem, because it is not a switch, but rather a remote control that is wired into the light switch box. All you need is a hot wire to provide it power, and tada, you have independent controls for you fan or light (even if your light switch is not wired this way). It was easy to install. I bought 2 concept II fans, so out of the box, the switches would conflict with each other. Took about 5 seconds to remedy the issue. Flip one of the dip switches on one of the switches, turn on the power switch, and hold down the stop button for 5 seconds until the light on the fan blinks. All in all, very happy with the purchase. Now I can turn on the fan or light from the wall, hop into bed, and turn it on/off without having to get up. Great product Minka Aire!Best Deals for Deluxe Remote Wallmount
The Minka-Aire WC212 wall control works just like the remote that came with my fan. I was surprised the wall switch wasn't included with the fan. After some custom modifications the wall switch works great. But the modifications were necessary for mine to work at all. This, in my opinion, speaks very poorly of Minka-Aire.The issues:
1) When installing into a standard wall switch box the wall control simply did not fit. It is too tall by about 1/8". This is ridiculous. I checked it in a few other boxes and it barely fit in one and was too big for the rest. I modified by wall switch box so that it would fit.
2) The LED light on the bottom part of the control, that others have mentioned, was so bright I couldn't sleep. The LED is absolutely unnecessary and really quite stupid. When the light is on, why would I need an LED showing me the location of the control. Really poor engineering. I took the control apart and removed the LED. It isn't difficult if you have some jewelers screwdrivers and a soldering iron.
Now that I have spent quite a bit of my time fixing the, in my opinion, stupid design flaws in this product; it works great. Does exactly what it supposed to do and it's great to have both the wall switch and the remote.
Along with fixing the above issues, I'd suggest adding a timer. I would like to be able to have the fan go off at a pre-set time but still retain the ability to use the remote control.
Honest reviews on Deluxe Remote Wallmount
We have several Minka fans around the house and these wall switches are a great way of making sure that you always have the ability to control the fan speed and the dimmer controls without having to locate the wireless remote. I do have one problem with this control though and it's almost a deal breaker. When the on/off switch on the wall control is in the on position the switch lights up with a very bright green LED backlight. I have found no way to disable this and it's so bright in our bedroom that I eventually had to mask off the entire lower part of the remote with electrical tape so that we can leave the fan running at night but not have the green lamp blaring into our eyes.My advice to Minka is that they need to provide a way to disable the LED so that a user can turn it off if they don't want it (without turning the entire fan off).. I could not even find a way to snip a lead wire, etc, to kill the stupid thing. I'm smart enough to know if my fan is on or off without needing a green lamp lit up all night telling me it's switched on.
Can you tell that I find this annoying? Yes, it's very annoying. I have spent over a grand on Minka fans and controls, but don't know if I'll be buying any more of these wall controls since they are too bright in a dark room.
OK, I've figured out how to disable/remove the LED and will post a few pictures of this as well. I assume no responsibility if you try to do this and destroy your switch (I actually inadvertently destroyed one in the process of figuring this out, because it was difficult for me to figure out where the LED was. It's also worth noting that my directions are for the WC212 not the WCS212 version which I guess is a little different.
1. Cut mains power at the circuit breaker and remove the switch from the wall wiring.
2. Remove the metal surround/ground plate from the switch.
3. Carefully push in the plastic tabs with a small flat object and separate the back plastic housing from the rest of the switch. You have wires threaded through this housing and there is no need to remove it completely as then you would have to re-insert the wires and remember where they go.
4. There are three screws that hold the forward body of the switch to the main printed circuit board. Remove these and keep track of which one goes where.
5. Separate the forward body (carefully) from the main printed circuit board. You will observe that there is a small white plastic surround clip around the black switch on the PCB, if this falls off you will want to place it back on the switch before you re-assemble.
5. Observe the forward portion that you removed which has some metal prongs that insert into the main PCB. On the side with the pins you will see that there are a couple of plastic clips. Squeeze these and remove the small green PCB that includes the light as well as the rubber/plastic control pads. Be careful not to lose any of these parts.
6. If you look at the end of the PCB you will see that it is in the shape of an L. There is a label on it that says "LED 3". This is the offensive LED. Initially I tried to cut one of the PCB leads on the board, but in the end it was easier to just carefully pry the LED off with a sharp pocket knife. This will not affect the operation of the switch.
7. Carefully re-assemble the switch.
If you're handy this is not particularly difficult... initially I had trouble finding the LED, and in the process of testing (I turned the breaker on to figure out where the light was) I destroyed one switch (shorted the switch on the ground plate, pop, fizzle, no more switch)... so be careful.
With the LED removed it is now a 5 star product, but I should not have to remove the LED in the first place, so I will only upgrade my review to three stars.
Find helpful customer reviews and review ratings for Deluxe Remote Wallmount
Minke has changed their controls. They went from a 4-pin system to an 8-pin system. They are not cross compatible. Check carefully before you install and toss the packaging. It should be clearly stated in the product description but it is not. Buyer beware.
0 comments:
Post a Comment