
List Price: $34.55
Sale Price: $13.68
Today's Bonus: 60% Off

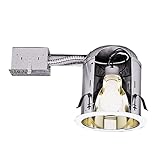
The Halo H7 can is the most common high hat model sold by Cooper and they have kits that make it easy to change them later for use with LED modules when they come down in price. Not mentioned by the seller but this is a air tight can and if makes no sense to use any other type in a house with the costs of home heating. Standard cans will leak heat from the house up into the attic like crazy.
Three different versions of the H7 for new construction only, for remodel, or for new construction and remodel. The size of the ceiling cutout is different for these. For the remodel one sold here you need a 6-1/4" while for the other two you need a 6-1/2" hole saw. If you are cutting through a plaster ceiling you will quickly find that these two sizes do not exist in carbide grit hole saws. Same goes for the Halo 3" recessed light cans that need a 3-3/4" ceiling hole.
I rely more and more on my Hole Pro adjustable hole cutters with all the new sizes (Halo alone has 11 different cutout sizes for its recessed light cans. With the tungsten carbide blades it cuts well even with thick plaster.
Hole Pro X-230 Kit: 1-7/8" to 9" and all fractional sizes in between. Infinitely Adjustable Cutter with Twin Tungsten Carbide Blades needs ¼ drill power of a hole saw to quickly cut Plywood Sheetrock Plaster Fiberglass OSB Plastic MDF Hardie Board
HOLE PRO BT-002: Tungsten Carbide Blade Set
Click Here For Most Helpful Customer Reviews >>
I just installed three of these H7RICT 6-inch housings in our insulated dining room ceiling. The toughest part about installation is running the wire and cutting the holes in the sheet rock. They come with a paper disc template for cutting the correct hole size which I believe is 6-3/8". I used a roto-zip tool with a circle cutting attachment, but even a 6-1/2" hole saw could be used (the lip on the can is 1/4") I believe the four spring clips are placed so by rotating the can, you can install the can right up against the rafter/floor joist if you need to.The cans are advertised as Air-Tite compatible, but the cans themselves have several holes/slots, so you need to buy the Air-Tite trim to seal them. (The trim & bulb are shown in the picture, but are not included) Note, even the Air-Tite trim I used the ERT713TS doesn't automatically come with the gaskets you'll need I did find some thin foam rings which go between the ceiling and the trim flange (GA-ATTRIM kit, set of six), but you really need something between the bulb socket and the trim insert as well. (or, maybe a gasket you could slide onto the bulb before you screw it in.)
They are very easy to install. The electrical box attached has several round knock-outs, but also has smaller tabs at the corners which can be bent back with a screw driver to accomodate romex type wire. The included quick-connectors (one each for hot, neutral and ground) have three open holes each, so it's easy to daisy-chain the wire from light to light to the switch. Just strip the wires 1/2" and insert
Once the wiring is complete pull the spring clips back into the can and insert the can, electriacl box first, into the ceiling. Holding the can up tight, the spring clips can be pushed inward at the top and then slid upward, causing them to rotate into position. (As I did this, I used a thin screw driver in the slot to push the attic insulation out of the way.) Once you've pushed the spring clip up as far as you can by hand, use a screw driver to push them up further (about another 1/2-3/4") and they will lock into place. That's it!
One reviewer gave these one star, complaining about the spring clips. There is a small flange bent out from the clip which gives you a place to push against. Pushing the clips upward to lock them down, may not be intuitive, but it works. Just push until the flange reaches the top of the slot. I didn't need a hammer to do this. They should accomodate 3/8" to 5/8" thick ceiling material and they DON'T pop back out.
A small wing nut on the side of the can holds the bulb socket plate in position. I had to losen this quite a bit to get the plate to move up enough (and over a tab which protrudes from the can) to accomodate the Air-Tite trim I purchased. I didn't really crank the wing nut down super tight, so then when inserting the trim, it's spring arms (which fit into brackets built into each side of the can) pull the trim up tight to the ceiling and at the same time push the socket holding plate up slightly to the correct spot without any trial and error.
Best Deals for Halo H7RICT 6-Inch IC Housing for Remodels
Halo recessed can lights are easy to find and they make LED adapter kits which are not difficult to install. The can itself is a poor design for remodel use. The bracket between the can and the junction box is too thick and too high and the recommended opening is too small. The template that comes with the can is for a 6 1/4 inch hole and the can alone takes 6-3/8 with the tape and at that size pushing the arm and can through the hole can lead to broken sheetrock. The side clips depend on gravity to stay in position and this does not work well when having to tilt the can to get it into the opening. The Juno, Progress, Utilitech, and Con-tech light cans are a lot faster to install.The "air tight" is mostly hype. A thin piece of foam tape is wrapped part way around the can and is not about to make a tight seal. Any manufacturer can say they have a can that meets the new air tight regs but nobody is actually testing the cans to see if they really work and I have found none that do.
They all take a different size hole in the ceiling and like the 6 1/2 inch hole for the Halo ceiling light cans there are no carbide hole saws the right size. Easiest to use an adjustable hole cutter and get the hole size you need which changes between models even for the same size lamp and with the same manufacturer.
Honest reviews on Halo H7RICT 6-Inch IC Housing for Remodels
5 stars, Item fits great. easy to install, no dislikes that i could think of. overall it was just what i needed.Find helpful customer reviews and review ratings for Halo H7RICT 6-Inch IC Housing for Remodels
I had no problem installing these lighting cans.I found removing the clips before inserting the cans into the ceiling was the way to go, since the template holes were a little tight. But I prefer that than having the ceiling holes too big.
Once the can is inserted into the ceiling simply slip the clips back into place. Then push the clips through the opening to prepare to "set" them in place. To actually "set" the clips using a small (flat-tip) screw driver. I inserted the screwdriver head through the round hole in the clip and used it to push the "outside the can" end of the clip out as I was pushing the "inside the can" end of the clip down to "set" it in place. Once it "sets" in place then simply use the same screwdriver to push "inside the can" end of the clip up into its' locked position. The hole in the clip is the same hole they recommend you use a 14 x 1/2" screw if it's in an area with alot of vibration. By the way I couldn't find hex head screws this size, so I went with slotted pan head screws (just in case).
The wiring with the quick connect fittings was super easy. You only need to trim a 1/2" of coating off the white and black wires.

0 comments:
Post a Comment